Three years ago, I was still printing threads directly into parts and watching them strip after two or three uses. Or worse, designing hex nut pockets that never quite lined up and needed three hands to assemble.
Then I tried threaded inserts. Ten seconds with a soldering iron and you’ve got real metal threads in a plastic part. It honestly felt like cheating.
This guide walks through what inserts are, how to install them properly, the tools I actually use, and 15 real projects where they make a noticeable difference. If you haven’t tried them yet, fair warning: you’re gonna wonder why you waited so long.
What Are Threaded Inserts?
Think small brass cylinders. Machine threads on the inside, knurled (textured) surface on the outside. You push them into a 3D printed hole using a heated soldering iron, and the knurling bites into the melted plastic as everything cools down.
What you end up with is a permanent metal thread embedded in your plastic part. Bolts go in and out cleanly, and the whole connection handles real mechanical loads without stripping.
Why Not Just Print Threads Directly?
On paper, printed threads sound like a great shortcut. In reality? They’re awful for anything you’ll assemble more than once.
FDM layer lines create weak spots along the thread profile. An M3 printed thread might survive 5-10 bolt cycles before the plastic rounds off and everything spins freely. A brass insert? Hundreds of cycles, no problem.
Then there’s the tolerance issue. Printed threads demand tight dimensional accuracy, and most hobby printers just aren’t consistent enough to hit it every time. An insert doesn’t care if your hole is 0.1mm off. The heat installation process absorbs that kind of variance.
Why Not Just Use Hex Nut Pockets?
The other common trick is designing a hex pocket into your print and dropping in a standard nut. It works. But it’s got real drawbacks.
The nut can spin in the pocket if your tolerances are even slightly off. You need a second tool to hold the nut while you tighten the bolt from the other side. And the pocket itself eats up more space than an insert hole, which hurts in compact designs.
Inserts sit flush, don’t need back-side access, and are completely self-contained. For most stuff, they’re just the better option.
Types of Threaded Inserts
Not all inserts work the same way. Here’s what’s out there.
Heat-Set Inserts (The Standard)
This is what basically everyone in the 3D printing world uses, and for good reason. Heat them with a soldering iron, press them into a slightly undersized hole, and the plastic melts around the knurled surface.
Once everything cools, they’re locked in. Pull-out force on a properly installed M3 heat-set insert in PETG sits around 200-300 newtons. That’s way more than most printed assemblies will ever see.
You’ll find two main styles: tapered (cone-shaped entry) and straight-knurl (uniform diameter). Tapered ones are more forgiving because they self-center in the hole. Straight-knurl inserts require more careful alignment but work in blind holes where depth is tight.
Press-Fit Inserts
These get pushed or hammered into a tight hole. No heat involved. The knurling just bites into the plastic through friction.
Faster to install? Sure. But they hold with a lot less force. Fine for panel covers or decorative assemblies. Skip them for anything that needs to take real load.
Ultrasonic Inserts
In factory settings, ultrasonic vibrations install inserts at high speed. The vibration generates localized heat right at the insert-plastic boundary.
You won’t be using these at home. The machines cost thousands. But if you’ve ever cracked open a consumer electronics product and noticed threaded inserts in the plastic housing, that’s likely how they got there.
Expansion Inserts
These have a slotted design that expands outward when you drive a bolt into them, wedging against the hole walls. You’ll see them more in wood and sheet metal than 3D prints.
They can work in printed parts, but that expansion force loves to crack thin walls. Stick with heat-set for FDM.
Tools You Need
The good news is you don’t need much gear. Four things will cover every insert install you’ll ever do.
Soldering Iron with Insert Tips
This is the big one. You need a temperature-controlled soldering iron. Not one of those fixed-temperature cheapies from the hardware store.
The Hakko FX-888D is what I use daily. Heats up fast, holds temperature right where you set it, and accepts the insert tips that make installation way easier. It’s also just a great soldering station to have around for electronics work.
If you want something portable, the Pinecil V2 is a solid pick. USB-C powered, heats up in seconds, and there are insert tips available for it too.
Don’t have a soldering iron at all? The 3DZWMAN Heat Set Insert Tool Kit comes with a 60W digital iron, multiple insert tips, and a pile of inserts to get you going. Decent starting point if you’re buying from scratch.
Dedicated Insert Tips
These replace the standard pointed tip on your soldering iron. Each one is sized to match a specific insert diameter, so the insert sits centered and goes in straight.
This 8-piece insert tip set covers M2 through M8 and fits most common irons including the Hakko, Pinecil, and TS100. Way better than trying to balance an insert on a conical tip.
Can you install inserts without dedicated tips? Yeah, use the flat side of a standard tip and push them in. But you’ll fight alignment the whole time and end up with crooked inserts more often than not. The tips cost a few bucks. Buy them.
Threaded Insert Kit
Grab an assortment kit so you’ve always got the right size on hand. Running out of M3x5mm inserts mid-project is annoying.
The 520-piece M2/M3/M4/M5 assortment kit is what sits on my bench. Covers every size I use, and the sorted case makes it quick to grab what you need. 520 pieces sounds like a lot, but M3s disappear fast once you start designing inserts into everything.
If you want inserts plus matching screws in one box, the Mardatt 595-piece kit throws in hex socket cap screws, nuts, and washers alongside the inserts. Nice for prototyping when you don’t feel like sourcing fasteners separately.
Digital Calipers
You need calipers to measure your inserts and check your printed holes. Even with a perfect CAD model, printers have dimensional variance. You want to verify the hole is right before committing an insert to it.
The HARDELL Digital Caliper is rechargeable, reads to 0.01mm, and flips between mm/inch/fraction. Plenty accurate for insert work. If you’re doing any functional 3D printing, you should already own calipers. They’re on our list of must-have 3D printer accessories for a reason.
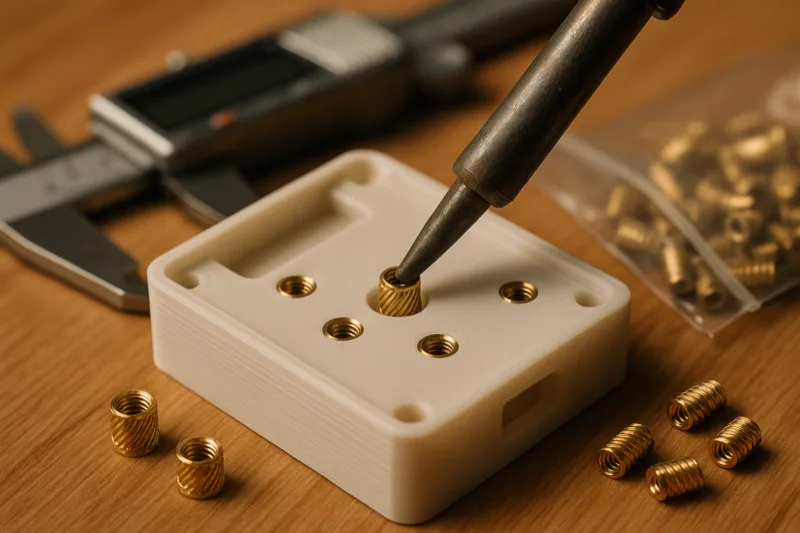
How to Install Heat-Set Inserts
Here’s the process I follow every single time. It’s honestly pretty simple once you’ve done it a few times. But the little details are what separate a clean install from a sloppy one.
Step 1: Design the Hole
Your hole diameter needs to be slightly smaller than the outer diameter of the insert’s knurled section. That’s what creates the interference fit. The insert melts its way into the plastic, and the knurling locks it in place.
I’ve got exact dimensions for each size in the reference chart below. General rule of thumb: measure your insert’s outer knurl diameter with calipers, then subtract 0.1-0.2mm for your hole diameter.
Make the hole 1-2mm deeper than the insert length. This gives displaced plastic somewhere to flow instead of pushing up around the top.
Step 2: Print the Part
Make sure you’ve got enough wall thickness around the hole. I don’t go below 2mm (four 0.5mm walls) around any insert location.
Thicker walls mean more plastic for the insert to grip and less risk of heat warping the outer surface. I’ve got more on print settings in the next section.
Step 3: Heat the Soldering Iron
Set your temperature based on the filament material:
- PLA: 200-220C
- PETG: 240-250C
- ABS: 250-270C
You’re aiming for about 10-20C above the material’s print temperature. Too cool and the insert won’t sink in smoothly. Too hot and you’ll melt way too much plastic and end up with a sloppy hole that barely grips.
If you’re using dedicated insert tips, swap one on now and let the iron come all the way up to temp. Give it an extra 30 seconds after the display hits your target. The tip itself needs time to catch up.
Step 4: Place the Insert
Set the insert on top of the hole, knurled end down (that’s the tapered end, if you’re using tapered inserts). Make sure it’s centered.
Some folks put the insert on the iron tip first, then bring it down to the hole. I like placing it on the part and pressing the iron down onto it. Either way works fine. Go with whatever feels more controlled.
Step 5: Press In Straight
Gentle, steady downward pressure. Let the heat do the work here. Don’t muscle it.
The insert should sink in slowly over 3-5 seconds. If you’re forcing it, your iron isn’t hot enough. If it drops in with zero resistance, you’re either too hot or the hole is oversized.
Keep the iron perfectly vertical. This is where dedicated tips really earn their keep. They center the insert and prevent the tilting that leads to crooked installs.
Stop when the top of the insert sits flush with the surface, or just barely below. Don’t push deeper than you need to.
Step 6: Remove the Iron and Let It Cool
Pull the iron straight up and out. Don’t wiggle it. Any sideways movement while the plastic is still soft will widen the hole or shift the insert.
Wait at least 60 seconds before you thread a bolt in. I know it’s tempting. But if you test too early, the plastic is still soft and the insert can shift or spin on you.
Common Mistakes to Avoid
Going too fast. This is the number one reason inserts go in crooked. Slow down. Let the heat work.
Too much heat. An overheated iron melts way too much plastic, leaving gaps that kill pull-out strength. If you see big bubbles of melted plastic oozing out the top, turn the temp down.
Holes too large. If the insert drops in cold with zero resistance, your hole is oversized. The insert has to melt its way in. That friction is what creates the grip.
Not enough wall thickness. Thin walls bulge outward or straight up crack during installation. If your design can’t support 2mm walls around the insert, add a boss to beef up that area.
Testing too early. Seriously, just wait. Threading a bolt in before the plastic fully cools will push the insert sideways or deeper than you wanted.
Best Print Settings for Threaded Inserts
Your slicer settings matter more than you’d think for insert hold strength. Here’s what to tweak.
Wall Count
This is the single biggest factor for insert strength. More walls equals more solid plastic around the hole, which equals better grip.
I never go below 4 walls (at 0.4mm line width, that’s 1.6mm of solid perimeter). For parts where inserts carry real load, I’ll bump that to 6.
If your slicer supports variable wall count or modifier meshes, throw extra walls just around the insert holes. No need to slow down the rest of the print.
Infill Around Holes
20% infill is fine for the bulk of the part, but the area right around an insert wants higher density. 40-50% infill in that zone gives the knurling way more plastic to bite into.
Some slicers let you set infill modifiers for specific regions. In PrusaSlicer or OrcaSlicer, drop a modifier cylinder around the hole and crank it to 50% gyroid. Gyroid works especially well here because it distributes force evenly in all directions.
Material Choice
Not all filaments play nicely with heat-set inserts. Here’s my honest take.
PETG is my go-to for anything that gets inserts. It handles installation heat without warping, grips the knurling well, and has enough flex to absorb bolt-tightening forces without cracking. For a deeper look at how different materials compare under load, check out our strongest filament guide.
ABS works great too. Better heat resistance than PETG, so inserts stay locked even in warmer environments. Downside: ABS is pickier to print. You’ll want an enclosure.
PLA is fine for prototyping and light-duty indoor parts. But its low glass transition temp (around 55-60C) means inserts can loosen if the part ever sits in a hot car or near a heat source. I won’t use PLA for anything that actually needs to hold up.
Nylon is fantastic for inserts. Great grip, high heat resistance, and enough flex to handle stress cycles. But it absorbs moisture and is tougher to print, so it’s overkill for most hobby projects.
Layer Height
0.2mm layer height works perfectly. There’s no real benefit to going finer for insert strength. The insert couldn’t care less about your surface finish.
Going coarser at 0.3mm is fine too. You’ll get slightly less layer bonding, which technically means a little less pull-out strength. Not enough to matter in the real world, though.
Orientation
Try to orient the part so insert holes run vertically (parallel to the Z-axis). That way, the hole walls are made of continuous perimeters instead of bridged layers.
Horizontal holes (perpendicular to Z) technically work. But the layer lines running across the hole wall create weak spots where plastic can delaminate during installation.
Insert Size Reference Chart
Below are recommended hole dimensions for the most common insert sizes. These are based on the standard CNC Kitchen-style tapered inserts, which are the most widely available type you’ll find for 3D printing.
| Insert Size | Bolt Size | Hole Diameter | Hole Depth | Min Wall Thickness | Best For |
|---|---|---|---|---|---|
| M2 x 3.5mm | M2 | 3.1mm | 4.5mm | 1.5mm | Electronics, small enclosures |
| M2.5 x 4mm | M2.5 | 3.5mm | 5.0mm | 1.6mm | Raspberry Pi mounts, PCBs |
| M3 x 5mm | M3 | 4.0mm | 6.0mm | 1.8mm | General purpose (most common) |
| M4 x 6mm | M4 | 5.6mm | 7.5mm | 2.0mm | Camera mounts, jigs, brackets |
| M5 x 7mm | M5 | 6.4mm | 8.5mm | 2.5mm | Heavy-duty, furniture, fixtures |
Important note: These dimensions work for most inserts from major suppliers, but always measure your specific inserts with calipers before locking in a design. Different manufacturers use slightly different knurl diameters. A 0.2mm difference in hole size is all it takes to go from perfect fit to loose.
Print a quick test block with 3-4 holes at slightly different diameters (step by 0.1mm) and test-fit your inserts before printing the real part. Ten minutes of testing beats an hour of reprinting.
15 Projects That Use Threaded Inserts
Alright, here’s the fun part. These are all real-world projects where threaded inserts take a print from “neat prototype” to “actually useful thing.”
1. Custom Electronics Enclosures
Probably the most common use case out there. Any box that houses a Raspberry Pi, Arduino, ESP32, or similar dev board benefits from inserts.
M2.5 inserts in the corner standoffs let you bolt the PCB down securely. M3 inserts along the lid let you open and close the enclosure over and over without wearing out the screw holes.
I’ve printed enclosures for home automation controllers that get cracked open every few months for firmware updates. After 20+ cycles, the inserts still feel brand new. Printed threads would’ve given up after round three.
2. Camera Mounts and Tripod Adapters
Cameras use 1/4”-20 threads for tripod mounting. You can buy 1/4”-20 threaded inserts and heat-set them right into custom mounts, clamps, and adapters.
I printed a GoPro-to-tripod adapter with an M5 insert on one end and a GoPro quick-release tab on the other. Maybe 15 cents in filament and one insert. The Amazon equivalent was $15. That kind of math is hard to argue with.
Ball-head mounts, articulating arms, suction cup adapters. All perfect candidates.
3. Keyboard Cases
The mechanical keyboard crowd is all over threaded inserts. Custom cases use M2 or M2.5 inserts for PCB mounting screws and M3 inserts to hold the case halves together.
With inserts, you can swap PCBs and plates without trashing the case. For a hobby where people change switches and layouts constantly, that matters a lot.
Fair warning: insert placement has to be precise to match PCB mounting holes. Measure twice. A misaligned insert in a keyboard case means the whole print is scrap.
4. Drone Parts and Mounts
Drones vibrate like crazy. Printed threads in that environment? They last about one flight before loosening up.
M3 inserts in motor mounts, GPS holders, and battery trays handle vibration without backing out. Brass threads keep their grip even under sustained high-frequency shaking.
I’ve seen racing drone pilots running fully printed frames with inserts at every bolt point. Lighter than aluminum, cheaper to replace after a crash, and the inserts survive even when the frame around them cracks.
Camera gimbals, FPV antenna mounts, anything that gets bolted on and occasionally swapped. All good uses.
5. Jigs and Fixtures for Woodworking
This one caught me off guard with how useful it turned out to be. Woodworkers use 3D printed jigs for guiding drill bits, setting consistent spacing, and holding parts at specific angles.
M4 and M5 inserts let you bolt a jig to a workbench or clamp it to stock. The inserts hold up to clamping force without pulling out.
A drill guide jig with inserts and wing bolts for quick positioning is one of my favorite functional prints. Repositioning takes seconds instead of wrestling with clamps.
Dovetail spacing templates, shelf pin jigs, router guides. They all work great with inserts for repeatable positioning.
6. Tool Holders and Organizers
Wall-mounted tool holders with inserts can be pulled off and rearranged without destroying the mounting holes. M4 inserts with flat-head bolts give you a flush mounting surface.
I’ve got a set of hex driver holders on my bench that mount with two M4 inserts each. When I reorganized my workspace last month, I just unbolted them and moved them over. No stripped holes. No wall anchors ripping out.
Modular storage systems like Gridfinity use inserts to connect base plates and accessories. The whole point of modular is rearranging stuff, and inserts are what make that actually practical.
7. Raspberry Pi and Single-Board Computer Cases
The Raspberry Pi uses M2.5 mounting holes. Printing a case with M2.5 heat-set inserts in the standoffs gives you a clean mounting solution that’ll survive dozens of reassemblies.
This matters more than you’d expect. Pi projects evolve constantly. You’re always swapping SD cards, adding HATs, rerouting cables. Popping the lid off and back on without worrying about stripped threads is a real quality-of-life improvement.
For server stacks and multi-Pi clusters, inserts in the spacer columns keep everything rigid and serviceable. I built a 4-Pi cluster rack where each board slides out individually on insert-mounted rails.
8. Phone and Tablet Stands with Adjustable Angles
Any stand with an adjustable hinge practically requires threaded inserts. The hinge bolt passes through one piece and threads into an insert in the other, so you can tighten it just enough to hold the angle.
Wing nuts or knurled thumb screws are perfect here for tool-free adjustment. M4 inserts are the sweet spot for phone stands. Strong enough to hold position but not so big they take over the design.
I print these as gifts all the time. A phone stand with smooth angle adjustment feels so much more polished than one that just leans against something.
9. LED Light Mounts and Panels
LED strip channels, ring light mounts, panel light housings. They all need secure but removable fastening. Inserts let you mount lights to walls, desks, or stands and reposition them whenever you want.
M3 covers most LED applications. For larger panels or heavier light arrays, step up to M4.
A 3D printed articulating desk lamp with inserts at every joint is a genuinely useful project. Each joint tightens independently, and the whole thing breaks down flat for storage.
10. Car Interior Mounts
Phone holders, dashcam mounts, gauge pods. Anything that bolts inside your car needs to handle vibration, heat, and repeated removal. This is one spot where I really push for ABS or ASA over PLA.
M3 or M4 inserts give you solid mounting points. Pair them with a heat-resistant filament and these custom mounts will outlast the cheap plastic ones from the auto parts store.
I’ve been running a custom vent-mounted phone holder for over a year. ABS with four M3 inserts. Never loosened, never rattled, and it fits my specific car perfectly.
Just be aware that car interiors get scorching in summer. PLA will absolutely soften and fail. PETG is borderline in hotter climates. ABS or ASA is the right move for anything that lives in a vehicle.
11. Furniture Hardware
Cabinet handles, drawer pulls, decorative knobs. All printable with inserts on the back side. Standard furniture bolt spacing is predictable, so the design work is straightforward.
M4 inserts handle cabinet pull loads with no problem. Print in PETG for kitchen cabinets where moisture resistance matters.
Custom drawer pulls that match a specific look are one of those projects that non-printer people find really impressive. The inserts are invisible from the front, and the finished hardware looks totally professional.
12. RC Car and Plane Parts
RC is a goldmine for insert applications. Shock towers, body mounts, wing adjusters, battery trays, servo mounts. Everything gets bolted together and everything vibrates.
RC parts take a beating. Crashes, jumps, rough terrain. With inserts, you can replace a single broken part without rebuilding the entire assembly.
M2 and M3 inserts cover most RC work. Print in PETG or nylon for the best impact resistance. Our strongest filament guide breaks down which materials survive this kind of abuse.
13. Custom Enclosures and Project Boxes
Beyond just electronics, any project box with a serviceable lid benefits from inserts. Waterproof enclosures with gaskets need consistent bolt clamping force to seal properly, and inserts give you that.
M3 inserts around the lid perimeter with matching socket head cap screws provide even gasket compression. Space them every 30-40mm for a reliable seal.
I print custom waterproof junction boxes for outdoor sensors this way. Six M3 inserts, a silicone gasket, and mine have survived two winters outdoors without a single leak.
14. Tripod and Monopod Accessories
Taking the camera mount idea further: tripod quick-release plates, phone holders for tripods, panoramic heads, and L-brackets are all easy prints with inserts.
The 1/4”-20 thread standard in photography means you can interface with basically any tripod gear. Print a custom quick-release plate sized to your specific camera and tripod combo.
Arca-Swiss compatible plates are a popular one. M4 inserts on the bottom for the tripod bolt, dovetail profile on top matching your existing ball head. I printed one for a mirrorless camera and it’s been my daily driver for over a year now.
15. Modular Panel Systems
Wall-mounted organization panels (pegboard alternatives, tool walls, monitor mounts) work best when they’re truly modular. Inserts are what make “bolt on, rearrange at will” actually work.
A base panel with a grid of M3 inserts accepts interchangeable hooks, shelves, bins, and brackets. Each piece bolts on securely but moves in seconds.
This concept scales up really well. I’ve seen full garage wall systems built this way. 3D printed panels with hundreds of inserts forming a completely customizable storage wall.
CAD Design Tips
Designing for threaded inserts isn’t complicated once you know the rules. Here are the details that’ll save you from reprinting.
Use Bosses
A boss is basically a raised cylinder around the insert hole. It adds extra wall thickness exactly where you need it without bulking up the entire part.
Boss diameter should be at least the insert’s outer diameter plus 3-4mm. So for an M3 insert going into a 4.0mm hole, you want the boss at least 8mm across.
They also double as alignment features. You can see at a glance where every insert goes, which really helps during assembly.
Chamfer the Hole Entry
Add a small chamfer (0.5-1mm at 45 degrees) at the top of each insert hole. This helps center the insert during installation and gives melted plastic somewhere to flow instead of mushrooming up over the surface.
Chamfered holes also just look better on the finished part. Small detail, but it makes a difference.
Design for the Right Depth
Make the hole 1-2mm deeper than the insert. That extra space acts as a reservoir for the plastic that gets pushed down as the insert melts in.
If the hole is exactly the insert length, displaced plastic has nowhere to go. It either squeezes up around the top (making the surface uneven) or builds hydraulic pressure that can crack thin walls.
Keep Inserts Away from Edges
Minimum distance from an insert hole center to the nearest edge should be at least 2x the hole diameter. Get closer than that and you risk the heat softening the edge during installation.
For M3 inserts (4.0mm hole), that means at least 8mm from center to edge. More is always better.
Account for Hole Shrinkage
FDM printers tend to print holes slightly undersized because of how the nozzle traces the perimeter. A 4.0mm hole in CAD might come out at 3.8-3.9mm.
This actually works in your favor for inserts. Tighter fit means better grip. But if your inserts won’t even start into the hole, bump the CAD dimension up by 0.1-0.2mm.
Print a test piece first. I can’t say this enough. Five minutes of testing beats an hour of reprinting.
Counterbores for Flush Bolts
Want the bolt head to sit flush with the surface? Add a counterbore above the insert hole. Size it for the bolt head diameter plus 0.3mm clearance, and set the depth to match the head height.
Socket head cap screws (hex key bolts) look great in counterbored holes. It’s a small touch, but it takes a print from “hobbyist project” to “this looks engineered.”
Frequently Asked Questions
Sure, but PLA's heat deflection temperature sits around 50-60C. That means inserts can loosen if your part gets even slightly warm. For desk stuff that stays indoors, PLA is fine. Anything structural or outdoors? Go with PETG or ABS instead.
M3 covers probably 80% of 3D printing projects. It's plenty strong for most assemblies and still small enough for typical wall thicknesses. Go M2 for cramped spaces like electronics enclosures. Step up to M4 or M5 for beefier things like camera mounts or furniture.
Nope, as long as you've got enough wall thickness. Keep at least 1.5-2mm of plastic around the insert. Too thin and the installation heat can warp or crack the walls. Adding a boss (basically a raised cylinder around the hole) gives you extra meat for the insert to grip.
Technically yes. You can reheat it and pull it out. But it's messy, and that hole is never going to be the same. Honestly, just treat them as permanent. They're so cheap that pressing in a fresh one is the smarter move.
Hundreds of times, easily. That's literally the whole reason they exist. Brass threads are far tougher than plastic ones. You'll strip the bolt long before the insert gives you trouble.
Heat-set inserts get melted into the plastic and bond mechanically with the knurled surface. Press-fit inserts rely on friction alone. Heat-set holds way better under actual load. Press-fit is quicker to install but can pull out without much effort.
Nah, any temperature-controlled soldering iron does the job. The thing that actually helps is a dedicated insert tip sized to your insert. It keeps everything centered and straight, which is way harder to pull off with a regular conical tip.
Sort of. Resin is a thermoset plastic, so it doesn't re-melt. You can't heat-set into it. You'd need to glue inserts in with epoxy or CA glue. It works, but that bond won't be as strong as a proper heat-set install in a thermoplastic like PETG.
Final Thoughts
Threaded inserts are one of those things that seem minor until you actually start using them. After that, going back to printed threads or captive nut pockets feels barbaric.
The buy-in is almost nothing. A bag of 500 inserts costs less than a spool of filament, and installation tips run under $15. Combine that with a soldering iron you probably already own, and every part you design can have real metal threads.
Start with M3 inserts and something simple. An electronics enclosure or a phone stand. Get the feel for the process on something low-stakes before you tackle a 20-insert assembly.
Once the muscle memory kicks in, you’ll catch yourself adding inserts to parts that don’t strictly need them. And honestly, that’s fine. Having the option to take something apart and put it back together without wrecking it is always worth the extra 30 seconds.
If you’re still finding your footing with 3D printing, our getting started guide covers the basics from choosing a printer to running your first print. And when you’re ready to push your parts harder, the strongest filament ranking will help you pick the right material.
Now go print something you can actually bolt together.


