I’ve run resin printers for years at this point. If there’s one lesson that took way too long to sink in, it’s that a neglected vat will tank your print quality faster than anything else.
Failed prints, hazy FEP film, weird little blobs drifting through your resin. All of it traces back to a dirty vat. I’ve watched people swap resins, re-level their build plate half a dozen times, and blame their slicer settings while completely ignoring the crusty mess in their vat.
Almost every time, the fix is stupid simple. Clean vat, better prints.
I’ve probably cleaned hundreds of vats across a dozen different machines by now. This is my exact process, the actual tools I reach for, and every bonehead mistake I’ve made along the way so you can skip the learning curve.
Why Vat Cleaning Matters
Your resin vat isn’t just a bucket that holds liquid. It’s the optical window sitting between the LCD screen and your print, and anything clouding that window is going to show up in your results.
Here’s what happens when you blow off cleaning.
Cured Resin Debris Wrecks Everything
Failed prints leave little chunks of cured resin behind. Those fragments settle right on the FEP film, exactly where UV light needs a clear path.
Next print, those bits get sandwiched between the build plate and FEP. That’s scratches, punctures, and torn FEP sheets. Ask me how I know.
I’ve also pulled cured chunks out of the resin that had fused into new prints mid-job. You get rough patches, layer defects, and surfaces that look like they broke out in hives. So much for that silky-smooth resin finish.
Cloudy FEP Kills Print Quality
Every single print leaves behind a thin film of semi-cured resin on the FEP. Left alone, it builds into a haze that blocks and diffuses UV light.
Diffused light means sloppy layer exposure. Sloppy exposure means mushy details, broken supports, and prints that look soft instead of crisp. Printing miniatures with fine detail? A cloudy FEP is quietly murdering your results.
Resin Contamination Causes Failures
Old, partially cured resin mixed with fresh resin is asking for trouble. The contaminated stuff cures unpredictably. Some spots overcure, some undercure, and your failure rate shoots up.
Mixing different resin colors or types in the same vat? Even worse. I once poured grey into a vat that still had dried clear resin stuck to the FEP. Print after print bombed until I realized the contamination was throwing off exposure across the whole build area.
Cleaning your vat kills all these problems before they start. Ten minutes of your time saves hours of head-scratching.
When to Clean Your Vat
You don’t need a full cleaning after every single print. But there are situations where skipping it will absolutely bite you later.
After Every Failed Print
This one isn’t up for debate. A failed print means cured resin is loose in your vat or stuck to the FEP. Hit “print again” without cleaning and you’re basically guaranteed another failure, plus you risk FEP damage.
I clean after every failed print. Zero exceptions. It’s 10 minutes that prevents a domino effect of failures that can eat your whole afternoon.
Before Switching Resins
Different resins cure differently and mixing them produces unpredictable garbage. Even going from one color to another within the same brand needs a clean vat.
Black resin residue mixed into clear resin? Enjoy your cloudy, tinted prints. Nobody wants that.
On a Regular Schedule
Even with successful prints rolling off, contamination creeps in slowly. Dust, FEP micro-particles, and degrading resin all pile up over time.
I do a full cleaning every 5-7 print sessions whether anything’s gone wrong or not. Same idea as changing your car’s oil. You don’t wait for the engine to seize.
When Print Quality Drops
If your prints start losing fine detail, showing rough surfaces, or failing more than usual, check the vat first. It’s the culprit about 90% of the time.
This is especially telling if nothing else changed. Same resin, same file, same exposure settings, but worse output? Clean the vat.
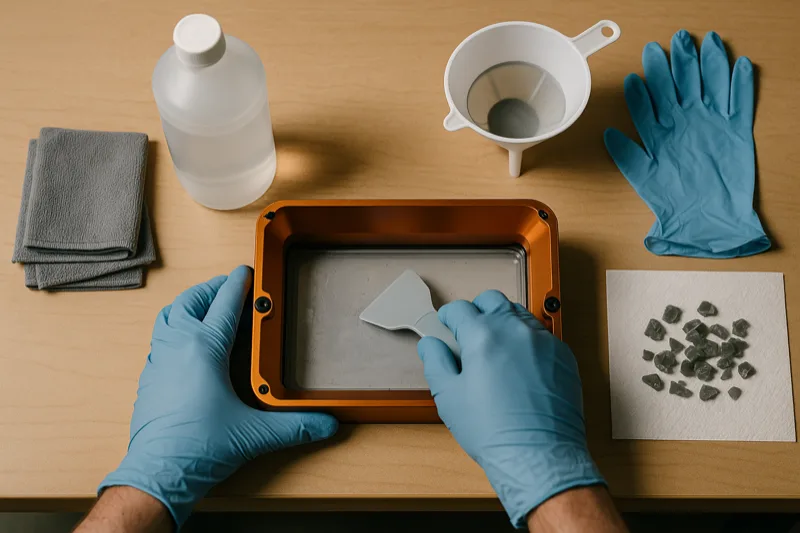
What You’ll Need
Here’s what lives at my resin printing station. Nothing here is expensive, and having it all within reach makes the whole process painless.
Nitrile Gloves
Most important thing on this list, bar none. Uncured resin is a skin sensitizer, meaning repeated bare-skin contact can trigger allergic reactions that get progressively worse and never fully go away.
I burn through a box of AMMEX Black Nitrile Gloves every couple months. They’re thick enough that resin won’t soak through but still thin enough to handle small parts and work a scraper.
Wear them every time you go near the vat, the resin, or anything that’s touched resin. This isn’t some overcautious safety lecture. It’s a real cumulative health risk that’ll catch up to you.
Isopropyl Alcohol (99%)
IPA dissolves uncured resin. Grab the 99% concentration, not the 70% stuff from the pharmacy. That extra water content in 70% IPA leaves residue behind and doesn’t clean nearly as well.
I buy Alliance Chemical 99% Isopropyl Alcohol by the gallon because resin printing chews through IPA fast. One vat cleaning can use 50-100ml depending on how grimy things got.
Store it somewhere ventilated and away from heat. The fumes aren’t great to breathe, and IPA is seriously flammable.
Microfiber Cloths (Lint-Free)
Paper towels shed fibers that stick to the FEP and wind up floating in your resin. Lint-free microfiber cloths don’t.
A pack of FIXSMITH Microfiber Cleaning Cloths lasts ages since you can toss them in the wash and reuse them. I’ve got a few dedicated to resin duty that I wash separately from everything else.
They’re soft enough for FEP film too. Light pressure, no scratching worries.
Plastic Scraper Set
You need a plastic scraper to get cured resin off the FEP. Plastic. Not metal. A metal scraper will scratch or puncture FEP film before you can blink.
The 8-Piece Resin Scraper Set covers you with multiple sizes and edge shapes. I grab the wide ones for big cured sheets and the narrow ones for picking at stubborn bits wedged in corners.
They’re cheap enough to toss when the edges get rough. A nicked-up scraper can scratch FEP just as badly as metal.
Filter Funnel and Strainer
Every time you pour resin out of the vat, it needs to go through a filter. Otherwise you’re dumping cured debris right back into the bottle and poisoning your whole supply.
The Sovol Stainless Steel Filter Funnel has a double-strainer setup that catches even tiny cured specks. It’s reusable, easy to clean, and way more dependable than those disposable paper funnels that clog and rip.
I’ve used disposable paint strainers too, and they’re fine in a pinch. But a solid metal funnel pays for itself after a few uses.
UV Flashlight
A small UV flashlight reveals cured resin that you can’t see under normal light. Uncured resin is basically transparent against clear FEP, but hit it with UV and every tiny speck glows.
The LET’S RESIN UV Flashlight at 365nm is perfect for this. Quick sweep across the FEP after cleaning and you’ll spot anything you missed instantly.
Don’t hold it on the resin too long though, or you’ll start curing it right there in the vat. A fast pass is all it takes.
Safety Glasses
Resin splashes during cleaning. It happens when you’re scraping cured bits or pouring IPA around. Getting uncured resin in your eyes is a trip to the ER, not a minor annoyance.
Any basic pair of safety glasses works. I keep mine right next to the printer so there’s no excuse to skip them.
FEP Film Replacements
You won’t need these every cleaning, but keep spares stocked. When an FEP sheet is shot, it’s shot. And waiting three days for Amazon to deliver while your printer gathers dust is no fun.
A pack of FEP Release Film Sheets (6-Pack) at 0.15mm thickness fits most popular resin printers. Double-check your vat dimensions before ordering so you get the right size.
Step-by-Step Vat Cleaning Process
This is my exact routine. Takes about 10-15 minutes and keeps my vats and FEP in solid shape for dozens of prints.
Step 1: Put on Gloves and Safety Glasses
Before you touch anything, glove up. I really can’t say this enough.
I got lazy exactly once. Grabbed the vat barehanded to “just quickly” pour the resin back. Had an itchy rash on my hand for a solid week. Never again.
Put on your nitrile gloves and safety glasses before the vat even leaves the printer.
Step 2: Remove the Vat from the Printer
Loosen the mounting screws and lift the vat straight up and out. Nice and slow. Resin sloshing over the sides onto your LCD screen is a bad time.
I always keep one hand underneath as I’m lifting, just in case. Resin on the LCD is annoying to clean and can actually damage the screen if it cures there.
Set the vat on a silicone mat or some newspaper. Spills happen, and a protected workspace makes cleanup way less painful.
Step 3: Pour Resin Back Through a Filter
Set your filter funnel on the resin bottle and pour slowly. Tilt the vat gradually so you control the flow. Dumping it all at once overflows the funnel and creates a mess.
The filter grabs any cured particles, skin fragments, or random debris that would contaminate your resin supply. I’ve found everything from tiny cured flakes to entire support rafts caught in my filter after bad prints.
If the resin’s been sitting a while, give it a gentle stir before pouring. Pigments and fillers settle over time, and you want everything mixed before it goes back in the bottle.
Step 4: Remove Cured Resin with a Plastic Scraper
After draining, inspect the FEP for any cured resin stuck to the surface. You’ll usually find flat patches, support nubs, or a thin cured sheet from a botched first layer.
Take a plastic scraper and gently work under the edges of the cured material to peel it away. Let the scraper do the work. Don’t jam it down against the FEP.
For big cured sheets, try flexing the FEP from underneath first. Push up gently on the outside bottom of the vat with your fingers and the cured layer often pops right off. Way safer than dragging a scraper across a large area.
Never, ever use a metal scraper. I don’t care how stubborn the resin is. Metal scratches or punctures FEP on contact, and then you’re swapping the whole film instead of just wiping it down. A single impatient moment costs you a $10-15 FEP sheet and an hour of re-tensioning.
Step 5: Wipe the Vat with IPA-Soaked Microfiber
Wet a microfiber cloth with 99% IPA and wipe the entire inside of the vat. Start at the top edges and work down to the FEP.
The IPA dissolves uncured resin film left on the surfaces. You’ll see the cloth pick up a faint tint from the dissolved resin. That’s all the stuff that would’ve contaminated your next print.
Hit the corners and edges where the walls meet the FEP too. Resin loves to hide in those seams, and cured bits tucked in corners can break loose mid-print and drift into your build area.
Give the outside a wipe as well. Resin drips on the exterior transfer to your hands, your printer, and eventually your fresh prints.
Step 6: Clean the FEP Film Gently
The FEP gets its own dedicated step because it needs extra care. This is the most fragile part of your vat, and rough handling here is the number one reason people burn through FEP sheets.
Dampen a fresh microfiber cloth with IPA and lay it flat across the FEP. Let it sit for 30 seconds to dissolve any residue, then wipe gently in one direction. Don’t scrub in circles. Circular scrubbing grinds particles into the surface and leaves micro-scratches.
I use almost zero pressure here. The IPA does the actual cleaning. The cloth just carries the dissolved gunk away.
Stubborn residue that won’t come off easily? Soak the cloth with more IPA and leave it sitting on the spot for a full minute. Then try again. Patience always beats pressure.
Step 7: Inspect the FEP for Damage
Hold the vat up to a light and look through the FEP from underneath. You’re checking three things: scratches, cloudiness, and punctures.
Scratches show as thin lines that catch the light. A few minor ones are no big deal, but deep scratches or heavy clusters mean it’s time for a new sheet.
Cloudiness is a hazy film that won’t wipe away. If the FEP still looks foggy after a thorough IPA cleaning, the surface has degraded. That haze scatters UV light and kills your print sharpness.
Punctures are obvious. You’ll see a hole or a thin spot that flexes differently than the rest of the film. Any puncture means immediate replacement. Resin will leak through and pool on your LCD screen, and that’s an expensive problem.
Bust out the UV flashlight here too. Shine it across the FEP at an angle and any leftover residue, scratches, or cloudy patches will glow against the clear film.
Step 8: Let It Dry Completely Before Refilling
Flip the clean vat upside down on a lint-free cloth and let it air dry for at least 10-15 minutes. IPA evaporates quickly, but you want it totally gone before fresh resin goes in.
Leftover IPA in your resin will cause exposure problems. The alcohol thins the resin and interferes with the UV curing reaction, producing soft, under-cured layers that peel off the build plate and stick to the FEP.
I learned this one the hard way. Poured fresh resin into a vat that still had IPA wet on the FEP. First three layers pulled right off the build plate and stuck to the FEP in a gooey mess I had to clean all over again. Wonderful.
Once everything’s bone dry, pour your fresh (or filtered) resin back in and get printing.
How to Clean a Cloudy FEP Film
Sometimes a regular wipe-down isn’t gonna cut it. If your FEP has built up a stubborn haze after a bunch of prints, it needs a deeper cleaning before you toss it.
The IPA Soak Method
Pull the vat off the printer and pour all the resin out through a filter. Then fill the vat with roughly a quarter inch of 99% IPA and let it sit for 15-20 minutes.
The longer soak breaks down resin residue that’s bonded to the FEP surface more aggressively than a quick wipe can handle. After soaking, pour out the IPA and gently wipe with a clean microfiber cloth.
I do this deep clean about once a month, or whenever the FEP looks hazy even after my normal cleaning routine.
The Sunlight Cure Trick
This one’s saved me from swapping out FEP sheets more times than I can count. If the cloudiness is actually a thin layer of half-cured resin that IPA won’t dissolve, you can cure it the rest of the way and peel it right off.
Set the empty vat in direct sunlight for 5-10 minutes (or use a UV lamp). That thin resin film cures into a solid sheet that peels cleanly away from the FEP. What you thought was permanent damage turns out to be totally removable.
Fair warning though: this only works if the cloudiness is resin buildup. If the FEP is still hazy after the cure-and-peel, the surface itself is worn out and needs replacing.
When Cleaning Won’t Fix It
If you’ve done the IPA soak, tried the sunlight trick, and the FEP is still cloudy, it’s done. The surface has degraded from UV exposure and chemical wear past the point of recovery.
Swap it out and move on. Squeezing extra prints out of a worn FEP just burns through resin on failed jobs.
When to Replace the FEP Film
FEP doesn’t last forever, and recognizing when it’s time for a new sheet saves you from chasing ghost failures.
Signs It’s Time
Persistent cloudiness that won’t respond to cleaning is the dead giveaway. Hold the vat up to light and if the FEP looks foggy even after a thorough IPA soak, the film surface has broken down.
Visible scratches from scraping mishaps or general wear eventually mess with light transmission. One or two faint marks? No big deal. A spider web of scratches across the build area? Time to swap.
Increased print failures with no other obvious cause is a strong hint. If your settings, resin, and leveling are all dialed in but prints keep sticking to the FEP or refusing to form, the film’s release properties are shot.
Soft or wrinkly spots in the FEP mean the tension has shifted. FEP needs even tension across its whole surface to work right. Loose spots create uneven layer exposure.
How Long Does FEP Last?
From my own experience, a well-maintained FEP film goes about 30-50 print sessions. Some people stretch further, some don’t make it that far. It depends a lot on how careful you are during cleaning and what resin you’re running.
Aggressive resins like high-detail or castable formulations chew through FEP faster than standard stuff. ABS-like and flexible resins can be harder on the film too because they grip tighter.
Print geometry matters as well. Big solid cross-sections that peel off the FEP with heavy suction force stress the film way more than small, sparse prints.
Keeping Spares on Hand
I always have at least 2-3 spare FEP replacement sheets sitting in my supply drawer. Nothing kills your momentum like finding out the FEP is toast and having to wait days for a delivery.
Swapping FEP takes roughly 20-30 minutes once you’ve done it a couple times. Your printer’s manual covers the specific tensioning procedure, and there are tons of video walkthroughs for each model.
Common Mistakes That Damage Your Vat
I’ve made most of these myself at one point or another. Hopefully my screw-ups save you some trouble.
Using Metal Tools on the FEP
The classic blunder. I see it on forums every single week. Someone grabs a metal spatula or razor blade to pry cured resin off the FEP and slices right through it.
Metal is harder than FEP. Every single contact leaves a mark, even if you think you’re being careful. Plastic scrapers only, full stop. If something won’t come off with plastic, flex the FEP from underneath or do an IPA soak. Never go to metal.
Scrubbing the FEP Aggressively
Even with a soft microfiber cloth, hard scrubbing generates friction that wears down the FEP’s non-stick coating. That coating is what lets cured layers release cleanly during printing.
Once it’s gone, prints start welding themselves to the FEP instead of sticking to the build plate. No amount of re-leveling will fix that.
Gentle, single-direction wipes with plenty of IPA. That’s literally the whole technique.
Leaving Resin in Sunlight
Resin cures in UV light, and sunlight is loaded with UV. Set your vat near a window or carry it outside during cleaning, and the resin will start curing into a solid slab right on your FEP.
I’ve watched people accidentally ruin a full vat of resin by leaving the lid off near a window for 20 minutes. The entire surface hardened into a thick disc they had to scrape off.
Keep the vat covered or work somewhere without direct sunlight. If you’re carrying the vat to a cleaning station, put a lid on it or drape a dark cloth over it.
Skipping the Filter When Pouring Resin Back
Dumping used resin straight back into the bottle unfiltered is like pouring muddy water back into a clean jug. All those tiny cured flakes, dust particles, and random debris go right into your fresh supply.
Next pour from that bottle, the contaminants come right back into the vat. Then they get pressed between the build plate and FEP, causing failures and scratches. Always filter. Always.
Not Drying Before Refilling
IPA left in the vat thins your resin and changes how it cures. You’ll get weak, mushy first layers that won’t stick to the build plate.
Ten minutes of air drying. That’s it. Don’t skip this.
Ignoring Small FEP Scratches
Today’s little scratch becomes tomorrow’s crack when a large print’s suction force pulls on it. If you spot a new scratch during inspection, keep an eye on it. If it’s anywhere near the center of the build area, swap the FEP before it fails mid-print.
An FEP blowout during a print means resin leaking onto your LCD screen. That’s a much more expensive fix than a $3 replacement sheet.
Resin Safety Tips
Uncured resin isn’t just messy. It’s genuinely hazardous stuff. Treating it casually is one of the biggest mistakes beginners make. If you’re getting started with 3D printing, don’t blow off this section.
Skin Contact is Cumulative
One splash probably won’t land you in the hospital. The real danger is repeated exposure causing sensitization, where your immune system starts treating resin like an allergen.
Once that happens, even tiny contact causes rashes, swelling, and itching. And it doesn’t reverse. I’ve talked to people who had to abandon resin printing entirely because they started reacting to the fumes alone.
Nitrile gloves, every single time. Not even for “just a quick pour.”
Proper Ventilation
Resin fumes aren’t as intense as, say, acetone or spray paint. But hours of breathing them in a sealed room adds up.
I run a small fan behind my printer aimed at a window. If your setup doesn’t have decent airflow, look into a fume extractor or at least crack a window whenever the vat is uncovered.
Disposing of Waste Correctly
Liquid resin can’t go down the drain. It’s toxic to aquatic life and it’ll clog your pipes as it cures.
Cure all resin waste before tossing it. Soaked paper towels, dirty IPA, leftover resin: spread it thin on a disposable surface and leave it in sunlight until it hardens completely. Once it’s solid, regular trash is fine.
Used IPA works the same way. Leave it in a clear container in sunlight. The dissolved resin cures and settles to the bottom. You can carefully pour off the clean IPA on top and reuse it for rough first-pass cleaning (not final wipes).
Storing Resin Safely
Keep bottles sealed, away from light, and out of reach of kids and pets. Don’t even leave the bottles on a windowsill. UV from sunlight will start curing resin right through the translucent plastic.
I store mine in a closed cabinet at room temperature. Cold thickens resin and makes it print poorly. Heat degrades it.
Quick Maintenance Schedule
Here’s the routine that’s kept my vats in great shape. Tweak it based on how much you’re actually printing.
| Frequency | Task | Why It Matters | Time Needed |
|---|---|---|---|
| After each failed print | Full vat cleaning (Steps 1-8) | Removes cured debris that causes cascading failures | 10-15 min |
| Before resin changes | Full vat cleaning + extra IPA wipe | Prevents cross-contamination between resins | 15-20 min |
| Every 5-7 prints | Filter resin, wipe FEP, inspect for damage | Catches gradual contamination before it causes problems | 10 min |
| Monthly | Deep IPA soak + FEP inspection | Removes stubborn residue, checks FEP health | 30 min |
| Every 30-50 prints | Replace FEP film | Maintains print quality and prevents leaks | 20-30 min |
| Every 3-6 months | Full vat inspection (frame, screws, seals) | Catches loose screws and frame wear early | 15 min |
This keeps things humming along without turning you into a maintenance maniac. The “after every failed print” rule is the only hard one. Everything else bends depending on how heavily you’re printing.
Running the printer daily? Bump the “every 5-7 prints” pass to twice a week. Only print on weekends? You can stretch it a bit.
Point is, a little regular upkeep always beats an emergency teardown.
Upgrading Your Post-Processing Setup
If you’re printing a lot of resin, having dedicated post-processing gear makes life a whole lot easier. Not just for vat cleaning, but for the entire workflow from build plate to finished part.
Wash and Cure Stations
A wash and cure station knocks out two of the biggest resin chores: washing uncured resin off finished prints in IPA, then curing them under UV light.
The Elegoo Mercury Plus 2.0 is what I use personally. It washes and cures in one unit, has a magnetic turntable for even UV exposure, and the built-in timer plus adjustable wash cycles take the guesswork out of post-processing.
The Anycubic Wash and Cure 3 is another good pick, with a gooseneck UV light that’s handy for spot-curing small areas. Both fit most common resin printers up to medium build volume.
Neither replaces vat cleaning. That’s still a hands-on job. But they speed up everything else in your resin workflow, which means less chance of contamination from half-cleaned prints near your vat.
Dedicated Cleaning Station
Don’t want a full wash and cure unit? At minimum, set up a designated area for vat cleaning with your IPA, funnel, microfiber cloths, and scrapers all within arm’s reach.
I use a silicone mat as my cleaning surface. Resin spills wipe right off silicone, and the mat protects my desk from IPA damage. A few paper towels underneath catch drips.
Having a set spot means you’ll actually clean properly instead of cutting corners. It sounds minor, but it makes a real difference.
Having the right 3D printer accessories organized and ready turns a messy chore into a quick routine. I’ve watched too many people bail on resin printing because their workspace was a disaster and cleanup felt like a punishment.
Frequently Asked Questions
You can, but keep it short and keep it dark. I throw the UV cover on plus a towel on top just to be safe. If you won't be printing again within a week, pour everything back through a filter into the bottle. Resin that just sits there collects dust, picks up ambient UV, and separates into layers that'll mess up whatever you print next.
Only with water-washable resin. Regular UV resin doesn't dissolve in water at all, so you'd just be smearing it around. For standard resin, 99% IPA is what actually breaks down and removes the uncured residue. Denatured alcohol or acetone can work if you're desperate, but IPA is gentler on the FEP.
Typical lifespan is 30-50 prints, but that number swings wildly depending on how you treat the film during cleaning. Watch for scratches you can't buff out, cloudiness that sticks around after a good IPA wipe, or prints that start failing for no obvious reason. I always keep a spare or two ready so I'm never stuck waiting on a delivery.
It's almost always one of three culprits: a beat-up FEP that's gripping the cured resin too hard, contamination from old cured flakes floating in the vat, or exposure settings that are off. Do a full vat cleaning, inspect the FEP closely, and re-level the build plate. Still happening? That FEP is probably toast.
Yeah, I do it constantly. Run it through a fine mesh strainer or paint filter and it goes right back in the original bottle. The filter grabs all the cured bits and junk. Just double-check nothing slipped past, because even one tiny cured particle can cause failures or scratch your FEP on the next print.
Honestly? Don't. Paper towels leave lint fibers everywhere, and those fibers end up stuck to the FEP or floating in your resin. They can also scratch the film if you're not careful. A pack of lint-free microfiber cloths runs a few bucks and you can wash and reuse them for months. Totally worth it.
Drain the resin first. Then push up gently on the underside of the FEP with your fingers to flex it. Nine times out of ten, the cured sheet just pops right off. If it's really stuck, pour a little IPA in and wait about 5 minutes for the edges to loosen up. Whatever you do, don't force it. That's the fastest way to punch a hole in the FEP.
Nope, vat cleaning is all manual work. IPA and microfiber cloths are all you need for that. Wash and cure stations are for your finished prints, which is a totally different step. But if you're printing regularly, something like the Elegoo Mercury Plus 2.0 or Anycubic Wash and Cure 3 does save a lot of hassle on the post-processing side.
Final Thoughts
Look, nobody picks up resin printing because they’re thrilled about wiping down FEP film with alcohol-soaked rags. I get it.
But this is the single biggest thing separating people who love their resin printer from people who sell theirs on eBay in frustration. A clean vat prints reliably. A dirty one wastes resin, wastes time, and spits out garbage.
My whole routine takes 10-15 minutes after a failed print. Maybe 5 minutes for a quick maintenance pass between successful sessions. That tiny time investment has saved me from countless failed prints, way too many FEP replacements, and more than a few bottles of expensive resin I would’ve trashed.
Grab the basics: IPA, microfiber cloths, a plastic scraper, a filter funnel, and nitrile gloves. Set up a dedicated cleaning spot. Follow the steps above. Your prints will come out better, your FEP will last longer, and you’ll actually enjoy the hobby instead of fighting it.


